Importing 3D characters workflow
In my point-and-click adventure game, I use 3D characters. They are easier to get online than 2D ones, and modifying them or adding animations is also easier. On the other hand, the whole process, from downloading the free assets to getting them into Godot is quite involved, so I decided to document it here.
Getting the 3D model ready
I tried a couple of websites with free assets, and the one I liked the most was sketchfab. It has a lot of models available (not only characters), licensed on CC-Attributions, which allows using the assets in any way (including commercially), as long as the author is reasonably acknowledged.
In this post, I will go through the process of importing the character and its animations to Godot using Anime boy by Zaria as the model.
The first stage of the process is making small changes to the model if needed. I do it in Blender. In the case of this boy, I covered the plaster on the face with the skin color, as it didn’t fit my idea of the model.
After loading the model in Blender, sometimes the materials are wrong: if that’s the case, the first thing I check is Material settings > transparency.
After covering the plaster on the face, I export the model as fbx, as the next tool doesn’t support glb standard.
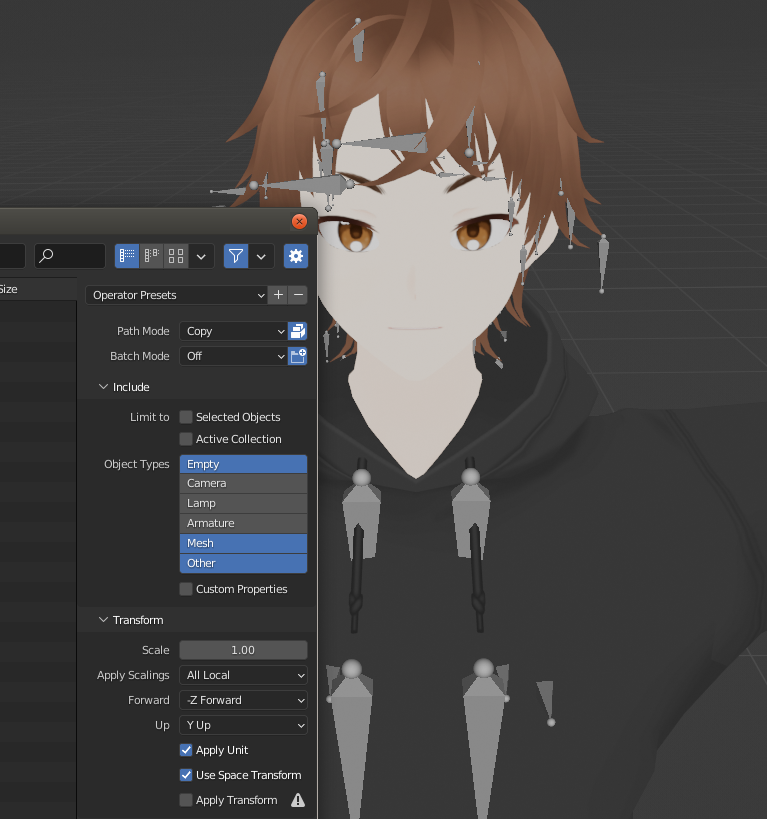
Due to a bug in Blender, if the original model was gltf/glb, the resulting fbx won’t have textures stored no matter what, but this is fine; we’ll attach them later.
Animations
The next stage in the pipeline is adding the animations to the model.
To make animating 3D models easier, animators add so-called armatures (or skeletons) to the models. They are sets of bones attached to the mesh, which control how it is modified during the animation. Bones are organized into rigs which allow changing the character on a higher level of abstraction.
As there is a general structure to the human body, one can create a single rig with 2 legs 3 bones each, 2 arms, 5 fingers, etc., and attach it to different human character models. This allows expressing the animations (like running) in terms of the rig so that one doesn’t have to recreate the animation from scratch to use it on a different character.
Animations: Mixamo
Mixamo is a website that gives away a number of human models with their rig and a lot of animations for them.
Note that rigs produced by different authors are not compatible with each other: if you have an animation that assumes that each finger consists of 3 bones, you cannot apply it to a rig with single-boned fingers.
Luckily, Mixamo comes with an auto-rigger: a tool that attaches the Mixamo armature to any character model to use it with the Mixamo animations.
For the auto-rigger to work, one only needs to select some key points in the body.

After the model is rigged and imported, you can select any animation (out of ~tens) Mixamo has available and play it with the model.
When downloading a model with an animation from Mixamo, you can choose it with or without skin. With skin would normally contain all the textures and the mesh, whereas without would only contain the armature.
As I would like to have multiple animations attached to the same mesh, I need to download one animation “with skin” and the remaining ones without, and join everything together later in Blender.
I downloaded an “idle” animation with skin, and “talking”, “running”, and “picking up object” without it.
Retargeting animations in Blender
To merge the 4 animations into a single object, I imported them into Blender again. As the fbx exported to Mixamo had no textures, after importing the model back from Mixamo, I go through every mesh (3 in my case) and change their materials from dummy, empty ones to the ones used by the original model. Note that this is only possible in the original blender file of the model, so I kept it while using Mixamo.
After attaching the textures, the original model is not useful anymore and can be deleted to avoid confusion.
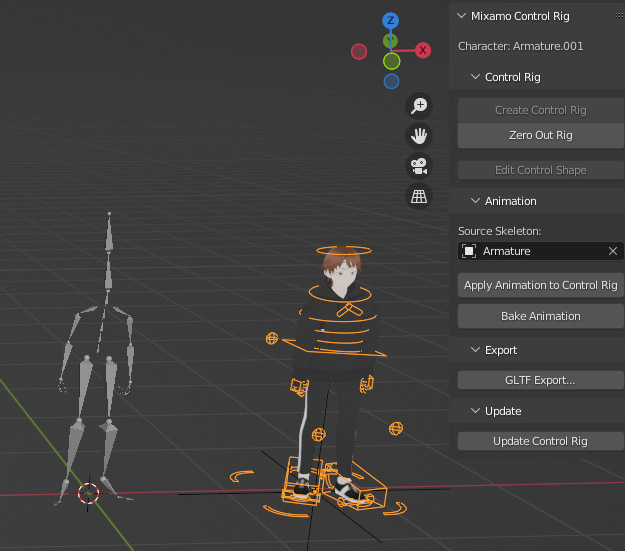
The process of transferring the animations from one armature (in our case: without skin) to another is called retargeting.
There is a Mixamo add-on for Blender that does it for us. It works in two stages: 1. creating a Control rig from the Mixamo armature 2. applying the animations from another skeleton to the rig
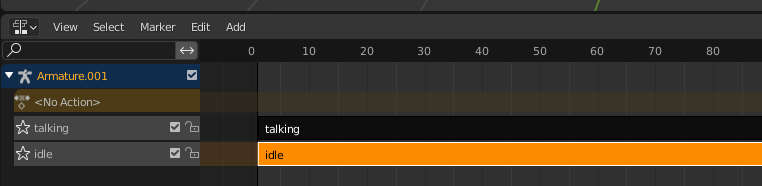
Animations in Blender are expressed in terms of “keyframes”, telling that “at this frame, the value of this parameter (e.g. X location of a leg) is that”. The set of keyframes for every bone and every frame is called an action.
A given mesh can only have a single action attached to them at a given time 1.
To store multiple animations for a given mesh, one needs to use the Nonlinear animation editor. It was originally meant to mix multiple actions, but game engines interpret separate actions (called “strips”) in the NLE editor as independent animations.
To create a new NLE strip from the current action of the mesh, one needs to click the “Push Down” button in the Action Editor. It’s convenient to rename the action and the resulting NLE strip to something meaningful.
Animation in placer
Many animations (like talking or standing) begin and end with the 3d model in the same position. It is convenient, as it avoids stuttering between the last and the first frame when the animation is looped.
Furthermore, when using the model in a game engine, it is convenient for the animation to not – actually – move or rotate the model’s center. This is because the position of the model, stored by the engine is used for various things (like checking if the character is on a platform) by the programmer. When an animation moves the character, the position of the character’s game object is not influenced, which may lead to errors.
For some Mixamo animations, like running, the assumption about not moving from the initial position is not satisfied.
Luckily, it’s easy to modify the animation to make it “in place” by zeroing out the movement of the “main” bone2, or, even better, normalizing it such that the main bone can move up and down a bit, as long as the final position is the same as the starting one.
I made a very simple Blender add-on that does it to simplify the process.
Moving objects
The process described above allows one to create a Blender object with multiple animations easily. What to do if we would like to have interaction between multiple objects, e.g. a character picking up a mug? In this case, we want the character to play the “pick up” animation from Mixamo, and the mug to start moving together with the hand at some point in the animation.
To encode an animation like this, I’ll use a Beer Mug model by Enn Shtyka.
Creating the armature
Similarly to characters, objects can have armatures, too. For the mug, the whole mesh will always move together, so there will only be a single bone in the armature.
To prepare the armature, I added the bone by clicking Armature in the add menu (Shift-A) and positioned it in the same place as the mesh (mug). To do the latter, it was useful to apply the transformations (Ctrl-A > all transforms) and Copy all to selected (Item > Transform > right click). Then, I made the bone a parent of the mesh3 by selecting the mesh, then the bone, and choosing parent > Bone.
Making the mug move with the hand
Next, I moved the bone such that the mug is placed in the neutral position, from which the character will pick it up. Once there, I needed to save the position on the first frame by creating a keyframe with i: this way, the animation will always start with the mug there.
Then, the mug needs to start moving together with the hand from some frame. To do so, I added a Child Of constraint to the mug bone, which points to the bone in the character that it should track4. Setting the Child Of constraint will apply the transformation of the hand bone to the mug; I had to click “set inverse” to preserve the previous position of the mug as the starting of the joint movement.
The mug would now move together with the hand, but they won’t be separated in the first frames when the hand just reaches for the mug. To achieve that, I set the “influence” of the Child Of constraint to 0 during the frames when the objects should be separate.
To do so, I went to the first frame, changed the influence to 0, and pressed i while hovering over the influence. The timeline got an extra line with the keyframe, and the influence changed the color to yellow (keyframed at this frame).
To make the mug start to move with the hand again at some frame (in my case: 40), I moved there on the timeline, changed the influence back to 1 (which made it orange), and pressed i again.
Unfortunately, this won’t make the influence to be exactly 0 for the first 39 frames. By default, the interpolation between keyframes is smooth (which makes sense when keyframing properties like position), so the influence grows slowly from 0 to 1, which is not what I wanted here.
To fix it, I went to Graph editor, selected the first keyframe (at frame 1), and chose the interpolation as constant.
Baking action
Now that I had a working animation in Blender, I wanted to export and open it in the Godot editor. One popular format in which people save 3d objects is glTF. Unfortunately, it doesn’t support the child of constraint, so I needed to express the mug animation without it.
The way to do this is baking, where Blender simulates the animation and encodes the position of the object frame by frame so that the game engine can read it.
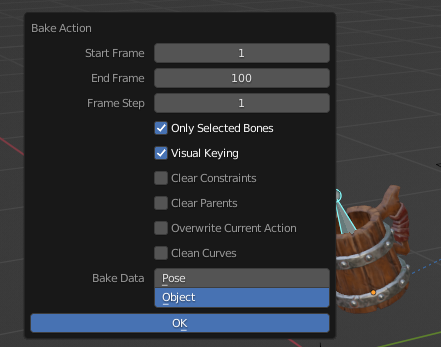
When baking, it’s good to set the length of the bake to be the same as the length of the other animation, as we’ll be running them together in the game engine.
As the last step, creating an empty in the same position as the character is useful, so that we can move the character there when starting to play the picking up animation.
After exporting to glTF, I check the size of the created file: if it’s <1MB, it likely doesn’t include the full mesh with the textures5.
Importing to Godot
Godot can open glTF/GLB6 files, but cannot save them.
I found that the most convenient for me workflow for importing the 3D models to Godot is:
1. copy the model to the Godot project’s directory.
2. open it in Godot, which will create a read-only scene
3. save this scene “as”, which will create an editable copy
4. to use the model within a larger scene, use instance child scene, pointing to the editable copy.
After following these steps, the import is ready. While importing multiple characters, I encountered a GLES2 bug in godot: when OpenGL version 2 is used, some of the transparent materials were showing “through” even though they should have had non-transparent materials behind them. I didn’t manage to find a fix; instead, I resolved to use 3rd version of OpenGL.
Even though there is a single, global set of actions, each of them only modifies the bones of a particular mesh. It can be confusing that changing the action will lead to no animation being applied as it controls a different mesh.↩︎
the movement of the remaining bones is recorded relative to their parents.↩︎
so that moving the bone in the pose and object modes will move the mesh↩︎
In my case,
Ctrl_Hand_IK_Right↩︎if it is so, check
Automatically pack resources, and that the mesh, and not only the armature is selected.↩︎GLB is a compressed, binary version of glTF.↩︎