Digital version of T.I.M.E stories
T.I.M.E stories is a cooperative board game where the players take the role of agents, who remotely control the avatars which are put in some turbulent moment of history to prevent spacetime disintegration due to events not going according to the historical record. Together with my girlfriend: Michalina Pacholska we decided to make a digital version of it.
Mechanics
Despite being a board game, T.I.M.E stories is mostly a decksploration game: each mission has an associated deck of 100–200 cards which define the game world to be explored by the players.
The deck consists of location cards, which describe the venue of the game, hero cards depicting avatars which players can impersonate during a mission, items which can be used by avatars, and others.
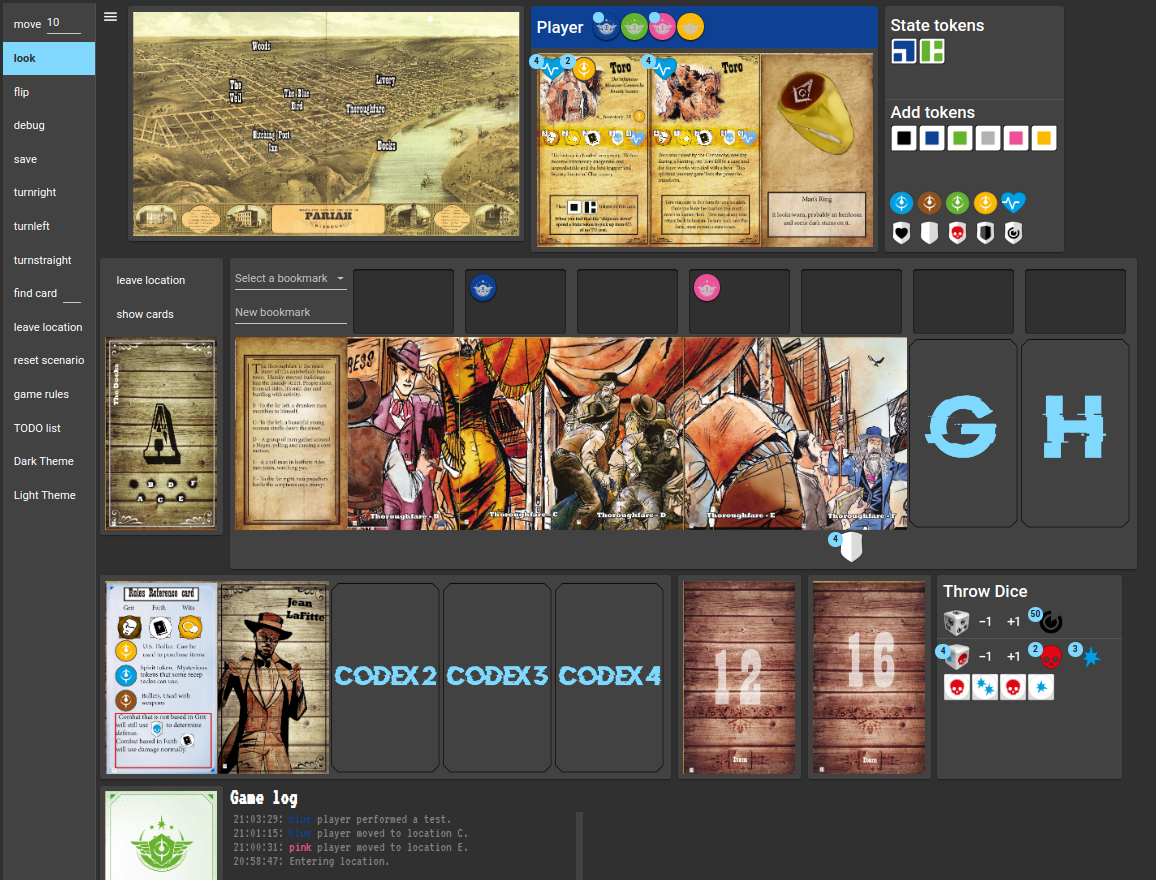
The location cards are grouped into bigger locations (like “windmill” or “the forest”). Agents explore a location by each choosing one card to see and following its instructions. On the cards there are NPCs to talk to, challenges to perform and items to collect.
An effect of visiting a given location card can be unlocking a new location, introduce some scenario-specific mechanic (eg. you can choose a random card and look at it for 5s or make it easier to convince an NPC to do something) or spending some precious time talking to an NPC which does not have any clue for you whatsoever.
Each agent has a unique set of traits that are described on its player card and collects the items separately (but the players can exchange items when they are on the same location card).
The change in the state of the world is implemented through receiving state tokens, which block some location cards or dialogue options (eg. you can’t ask an NPC about his brother if you don’t know him yet). The game tracks resources using a number of regular tokens.
The challenges with NPCs are resolved using a dice-based combat system, and the passage of time is measured in Time Units, passing whenever agents do actions or change locations. If the time allocated for a given run of the scenario passes, the run is considered failed and the agents need to start from scratch (but armed with the gained knowledge about the world).
Moving digital
We really like playing the game, but, being far from our usual gaming groups, we didn’t expect to be able to play it in real life in the foreseeable future (not to mention the raging pandemic). Because of this, we decided to build a digital version of the game, to be played in the browser.
At the beginning of this project, we had a rudimentary experience in web development, so the project was mostly a learning journey for us. Because of that, we have made many questionable engineering decisions along the way (and many we don’t know yet that are questionable), mostly trying to deliver the features without trying too hard to do everything right on the first try.
Assumptions
We have made the following design assumptions:
- We should be able to play a scenario without a need for a human to look over the cards. The scenario cards are available in non-structured formats (more on that later). Without looking at the cards we are not e.g., able to split cards into items and locations, but we also don’t spoil the game for the person preparing the scenario.
- We want the app to be a game simulator, ie. we assume that players will enforce the game rules (subtracting TUs, having access to a subset of locations, etc.) themselves. The scenarios often provide various innovative deviations from the basic rules, e.g. vehicles making it cheaper to move locations, resetting state tokens mid-scenario, a future-teller talisman allowing to see a random card in the deck, etc. We decided we want to give the players the final control over following the rules.
- We will not distinguish between different user connections to the server. In other words, everyone will be able to do the same actions, see the same cards, etc. As in the physical game, the users will choose the color of their pawn (which is used to mark the location card the agent is in), but nothing will prevent the users from changing it mid-game, peeking at other players’ cards, etc.
Preparing scenarios
The original game has many extensions to buy, containing different scenarios. There are also dozens of fan-made scenarios that are available to download for free (a list of them can be found here). In our app, we will be using the fan-made scenarios, which are available in two formats:
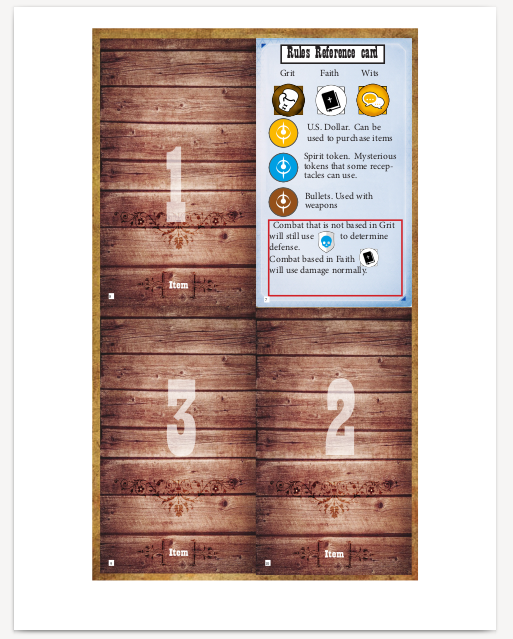
- as a pdf with 4 cards/page (ready to print)
- as a set of png files that contain a sheet of around 5x6 cards, either front or back.
In either of these, each card has a small number at the bottom, to be able to sort the cards and match fronts with backs.

To be able to use a scenario, we need to divide the cards into separate files. Ideally, the filename/directory structure would describe which card it is (eg. location X), but that is not possible without looking at the cards, so we decided to store the files under scenario/card_number with the file names (front|back).webp. We used webp as an image format because it offered great compression rates (and is supported by nearly all browsers).
We made two separate tools for cutting pdf- and png-based scenarios.
Pdf-based
Most pdf-based scenarios followed the same ordering of cards withing the scenario, so we were able to hard-code. A bigger problem here were different sizes of margins in different files.
We went for the human-in-the-loop approach for detecting the size of margins, where the user was choosing an appropriate margin for the first page of the scenario and we assumed that the margins don’t change within one file.
To make it convenient for the user to do so, the console-based tool was increasing a margin by a fixed amount when the user pressed + and decreasing it when they pressed -. Whenever the user changed the direction of change (i.e. going from a margin that’s too big to a one that’s too small), we decreased the amount of change, allowing the user to quickly get to a margin that’s nearly-perfect and finetuning it.
For example, if the user pressed ---+-, the first three signals would decrease margin by 16px each, the next one will increase it by 8px, and the next one will decrease it by 4px.
We observed that while pdf files opened in Chrome don’t refresh on change, the Evince viewer does refresh them, which made it more convenient to change margins without changing window focus.
We used PyPDF2, pdf2image, and curses to make this tool.
Png-based
When cutting the sheets of card images, there were no problems with margins (there are none), but instead, with the order of cards. Here, different scenarios had both different orderings: either first cards in each sheet are numbered 1, 2, 3, …, or consecutive cards in the first sheet and sometimes the order of a couple of cards was just mixed up without any (apparent) structure.
Initially, I decided to try out cutting the small part of the image where the card number was present and use an off-the-shelf OCR tool to read it. I used an apparently popular OCR tool: tesseract.
I suspected it will work out-of-the-box, but couldn’t be more wrong. I ended up: a) converting the image to black-and-white and increasing contrast to make it easier for tesseract to detect the numbers b) providing separate data files to tesseract, specially trained for mathematics, as I suspected the language bias would make it harder to decipher single numbers c) conditioned tesseract to detect only digits.
Even with these changes, I only managed to detect around half of the card numbers in every second scenario.
Obviously, this wasn’t good enough, so I again resorted to using human assistance. Having dissected the card numbers from the cards, I found it acceptable to show them to the user for detection, as they would not be spoilery.
Providing the readings for all the missing numbers would be a lot of work, so instead, we used the following algorithm:
- We try to predict the next number to be used using OCR (
OCR_t). - We predict the next number to be used as a linear extrapolation from previous two number:
diff_t := x_{t-1} - x_{t-2}.pred_t := x_{t-1} + diff_t. - If the two predictions match (
pred_t = OCR_t), we use it without asking the user:x_t := OCR_t. - If not, we ask the user who can either accept the second prediction or provide the input on their own.
Note that the second prediction would work for both orderings of the cards (assuming there are no errors in the ordering). In practice, as the number of places where the numbers would be mixed up was relatively small (say, <5% numbers), it worked quite reliably, with the user just confirming that the predicted number is correct most of the time, and providing the actual number in a small number of cases only.
Choosing a framework
We spent some time choosing which web development framework to use. Initially, we considered going for a minimal version in django where one person streams the “table” with all the cards and players just click appropriate links on their devices.
We decided to go for a more challenge (and learning) and go for a single-page application where the app would serve the game board to all players. After looking over the list of SPA-frameworks, we decided to give (Typescript-based) Angular and socket.io a go.
Only after hitting some first import errors and asking for help on StackOverflow, we realized that Angular itself is client-side only, and we need to have a separate server to be able to communicate between clients.
After taking another look at available options, we decided to go for MeteorJS, which proved to make it easy to synchronize the common state. For the frontend, we still used Angular and helped ourselves with meteor-rxjs to listen to changes in the data in a reactive way.
The database
Meteor uses a MongoDB database and a convenient interface to it in the form of Collections. In our case, the main part of the data lived in two collections: Cards and Holders with basically the following schemas:
CardsSchema = new SimpleSchema({
  number:  SimpleSchema.Integer,
  holderId: String
});

HoldersSchema = new SimpleSchema({
  name: String,
  cards: { type: Array, defaultValue: [] },
  "cards.$": String,
  currentCardIndex: {type: SimpleSchema.Integer,
                     optional: true},
  currentSide: {type: String, allowedValues: ["front", "back"], optional: true}
});
We assume the card number and side is enough info to find the URL of the card. In addition to the basic schema, we implemented a number of hooks when inserting or updating the data:
- When inserting a new card or updating holderId, we insert/remove the id of the card to the appropriate holders.
- After changing the set of cards in a given holder, we sort the cards by their numbers. When the cards are not sorted, finding a given card may be tedious in the deck of >100 cards. At the same time, as the scenario creators expected the deck to be initially sorted, the cards with consecutive numbers are semantically connected (e.g. cards of a given location).
- When we add a new card to a given holder, after sorting the cards, we make sure that the new card ends up on top of the deck. Otherwise, it was easy to move a card to a holder by mistake and lose track of it within tens of other cards.
The order of insertion
At the start of the game, we needed to insert all cards to a deck holder. We found all card numbers by listing a given directory, and then needed to add them one by one to the database (as the insert is only able to add one document to the database).
As the mentioned-above hooks are not atomic (for example to sort cards we need to first retrieve them from the database, sort them and insert them back), we need to make sure that the insertions to the collections happen in a synchronous way to prevent race conditions.
One way to do so would be to use the default mechanism for insertion for collections, which is synchronous and wait for the results. This would not allow us to reactively observe changes using meteor-rxjs (as it uses its own, asynchronous wrapper over insert). This would not be a big problem if we were to initialize the database once, but we also wanted to have a button that would allow us to change the scenario (and reinitialize the database) while the app is running.
In theory, this should be possible to implement using rxjs’ concat, which takes a number of Observables and subscribes to them one at a time, moving to the next one whenever the previous one finishes. The problem with that solution is that meteor-rxjs’ insert doesn’t wait for the subscription before inserting, so creating all the Observables for inserting all of the cards will already start calling the underlying inserts and their hooks, causing race conditions before we even start subscribing to any of them.
The solution we went for involved active waiting for when the subscription for insertion of card N is called before inserting the N + 1-th card. However, the simple:
let inserted = allCards.map(c => false);

for(; i < allCards.length;) {
  if (!inserted[i]) {
    inserted[i] = true;
    Cards.insert(allCards[i]).subscribe(() => { i++; });
  }
}
did not work. As Meteor methods are running in one fiber per client, running the code above will result in an endless loop which will never transfer execution context to the insert method.
Adding a simple await sleep(10), solved the issue, as the execution could go to inserting the appropriate card and returning whenever insertion finished.
Pulling cards
In the beginning, we implemented moving cards between holders as clicking one holder and then the other. It wasn’t very intuitive, so we decided to move them using drag&drop.
We opted for Angular Material’s Drag and Drop module. While the terminology suggests it’s made to move items between lists, we find it fine to consider a single card a cdkDrag and one holder to be a single-element cdkDropList.
Rotating cards
While most of the cards are oriented vertically, some of them present horizontally best. One popular example is the cards of the map, which show different locations available to the agents.
One problem which appears when starting to drag and drop cards is the behavior of placeholders which are shown in the to-be-dropped-into holders when the source and sink holder are of different orientation. The default behavior with the Drag and Drop module is to make the placeholder to be the same as the element being dragged. In our case that meant trying to show a vertical placeholder in the horizontal holder and vice versa, which looked wrong.
We fixed it with Renderer2, which is able to read and change the CSS class of any html element. We called it when processing the cdkDropListEntered event, which is called whenever we hover an item above a container.
Rolling dice
One part of the mechanics of the game is the use of dice to:
- Measure the passage of time which the agents have left
- Resolve the results of the challenges.
In the second case, the players throw a number of dice equal to the value of their statistic (like strength or eloquence) and count the number of “hits” which help the player succeed in the test and “skulls” which hurt the player.
Initially, we just made a panel where the player chose the number of players and received the total results, but while playtesting one of the scenarios, we stumbled upon a practice of re-rolling a die (e.g. one character was allowed to choose one of the dice after a throw and roll it once more, hoping for a better result). It wasn’t possible to do with our dice, as the player didn’t get the division of the total result into particular dice (was this score of 4 a 2 + 2 + 0 + 0 or 1 + 1 + 1 + 1?). Because of that, we decided to show separate dice with results (apart from the total) and allowed the user to click on any die to reroll it.
However, this wasn’t working perfectly from the UI perspective; the die could get the same result as the previous one after the reroll, and if this happened, the user doesn’t get any feedback that the system indeed registered the reroll. Because of that, we added an animation based on material where the previous die fades away and the new one slowly appears, so that the users see the change.
Another problem with the interface was that every time the agents leave a location one of the players should throw the Time Unit die to spend TU. In the physical game, everyone sees whether the die has been thrown and the score subtracted from the tracker. In the digital version, players don’t see whether others have thrown the die if they don’t track the available TU closely.
To make sure people know whether the die has been thrown already, we send every player a notification once anyone throws the TU die.
Player pawns
In the physical version of the game, every round every player puts their pawn above the location card they want to explore. We made something similar, where each players’ pawn is placed above the card they chose for the given round. One problem, which exists for either version of the game, is spending Time Units every round. As each player performs their actions somewhat independently of others, sometimes it’s hard to make sure every player has done the same number of rounds, especially when some of the players wait for others to finish their challenges.
To make it easier to keep of track the number of rounds each player did, we added a small mark that we put next to a player token whenever that player moves to another location or throws a die (each of which constitutes an action).

One facilitation we tried introducing to the gameplay was to automate the throwing of the TU die whenever players leave a location. We thought that leaving the location can be recorded whenever the first location card is removed, and we could throw the die without their action.
This had one problem though, as the fact of cards moving is independently observed by each of the players, so when we threw a die every time someone observed removal of the first card, the die was thrown 4 times. I didn’t want to send the request only from a player with a given color (e.g. only blue player), as there may be two (or none) players impersonating a blue player at a given moment. I tried to have a hacky version of the server refusing to accept the throw-die request for a short time after another player requested it, but as each player’s call is running a separate thread, it wasn’t reliable and we decided to abandon this feature.
Service
We decided to serve the application using Amazon Web Services, taking advantage of its global free tier, allowing us to use small amounts (way bigger than our needs) of compute and storage from a central-European cluster, which was useful for us as we didn’t want to spend time trying to speed up the request time/cache the requests.
Meteor up
To easily set the server up on the micro EC2 instance, we used Meteor Up. I was surprised how plug-and-play the tool was: it checks the connection to the server, bundles the whole meteor code, node, nginx into a docker container, sends it to the server, and turns it on.
There even was an option to bundle together the mongoDB database, but we went for setting it up ourselves so that we could make changes to it that would preserve new deploys of the meteor code.
Storage
For storing and serving the files we went for a standard S3 solution. One scenario is around 300 files and 30MB altogether, so the free tier allowance of 5GB of data was more than enough. The bigger problem was the number of requests: 20k GET requests and 2k PUT/COPY/LIST requests per month.
As during the scenario each client requests every card multiple times, I was worried we will get the limit on the number of GET requests, but after setting up appcache as well as the Cache-Control headers, the number of GET requests per (4h-long) game run was 2k or 3k.
The bigger problem turn out to be the PUT/COPY/LIST requests. I didn’t expect problems here, even though each file needed to be inserted separately, as we need to insert each scenario only once, so there could be around 6 scenarios we could insert per month, and we only do one LIST request per run where we initially create a database.
However, when trying the app out, I observed a bigger number of requests than the number of files suggested. I tried using AWS CloudTrial as well as server access logging, which are two tools for aggregating logs to show types and origins of the requests to S3 buckets, but didn’t find anything suspicious there, apart from the logs about inserting the logs themselves.
DNS, SSL
I already had a free website domain claimed from freenom.com and a DNS server set up at freeDNS, and I only wanted to set up another subdomain there.
Initially, I considered getting an Elastic IP address, which would allow me to attach the fixed IP to the different EC2 instances, which I was planning to take up and down; mostly because I didn’t want to waste the resources it is running on, as I was only planning to occasionally play with friends.
As the Elastic IPs are only free while the instance they are attached to is running, instead of using them I decided to go for the dynamic IP on the EC2 and used dynamic DNS service on freedns, which allows to set up a cron job on EC2 to request a change of the IP to the current address whenever the instance is up.
Final notes
This project was an experiment in web development, site hosting, and writing the blog post. Thanks for everyone who playtested the various versions with us.
The final state of the project can be seen here: